Tuesday, April 30, 2013

Notice; did you?

Regular readers may have noticed the blog, other than 28mm plastic notices, has been quiet of late.  Well, in part it's due to my wrestling with a new laptop, which of course at present has none of my photos or much else on it yet; but for the most part gaming has slid down the scale of priorities of late.

There are a couple of batreps to post up, and some painting continues, but I'm waiting for the gaming mojo to return a bit too.  Recent issues took the wind out of it's sails somewhat, and it felt like a good time to do other things...

A break is not a bad thing it turns out, and it seems likely the blog will refocus somewhat when it returns to full activity, hopefully soon.

Thursday, April 25, 2013

Perry Watch - (Yet) More Plastic News!

With Salute out the way, the Perry's have quietly updated their website with details of four upcoming plastic sets:


  • American Civil War Artillery (Wow!)
  • American War of Independence Continental Infantry (a logical choice)
  • Light Cavalry 1450-1500 
  • Foot Knights (not specified but clearly for 1450-1500)
I'll borrow one photo from them for reference but go look for yourself; with the Afrika Korps upcoming too there seems to be plenty to look forward too for 28mm Plastic gaming.

Monday, April 22, 2013

Agema Miniatures

I didn't go to Salute (I did three nightclubs this weekend instead!), it's too far south and I guess I'm not hardcore enough to be bothered.  Besides the blogosphere allows me to find out all about it afterwards!

One of the tidbits I have picked up with interest is the appearance of another Plastic miniatures venture; Agema Miniatures.  This is a very modest one compared to most but starts with a useful subject:


sixteen miniatures for a tenner, give or take.  The figures are in fact a single sprue with only two torsos, and a limited selection of options, but they look good and hopefully are the start of more to come.  If compatible with the Wargames Factory Numidians they could be varied up a fair bit I guess, but as they are they open up a variety of options.

There is also talk of  a Kickstarter campaign for the next sets, which I will be investigating.

Thanks to Mike at Trouble At T'Mill for the original posting...

Tuesday, April 16, 2013

Warlord Games: Germans and Americans - Assembled

Progress again with the Assault on Normandy boxed set.


I've assembled all the models.  As an initial review I would say that whilst the models are well tooled the German models are weaker than the Americans:


The issues are twofold, firstly the models' faces are a bit caricatured for my tastes, just a bit cartoony. Secondly the models are a challenge to pose any other way than in the proscribed arrangements of the assembly guide.  Now obviously that isn't a problem for Napoleonics figures - where having an entire unit at the march looks right - but for a 'modern' formation this looks unnatural.

The Germans were difficult to vary the pose of as there were few alternative arm positions in the set; nonetheless I did my best with the MG teams and the officer and medic.  The Americans were slightly better (being a later tooling) with a few more useful alternative arm arrangements, and I was more pleased with how they came out, including a nice little sniper team and another officer and medic combo.

Overall they're perfectly reasonable models, but not spectacular, and the value is not as good as other 28mm plastic sets.  25 figures for £22.50 does not compare well to other plastic figure ranges and I doubt I'd buy them myself (remember I was 'donated' these).

 Personally I have an inkling that the higher price on these is purely based on demand - need 300 figures for a game?  We'll let you buy them  at 40 for £20, need 60 figures for a game?  well I think you can pay twice the price per model then.  Games Workshop have long applied this business model, and it is a shame that it seems it applies here too.  Still they are cheaper than most metal miniatures for the period (but not always by as much as you'd expect), but for me the ease of using metal miniatures - when weight is never an issue, and the fact I already have 60 or more Germans and as many Americans....

Yeah, not convinced yet.  Let's see how they paint up though.

Saturday, April 13, 2013

Second Castalla - 13 April 1813

As close as was practical to the anniversary of the actual battle, I arranged a refight of this little known engagement from the eastern theatre of the Peninsular War.

The Wikipedia page for the battle is actually quite extensive and was the base for the orders of battle, and the period map below was used to design the field and the deployments


Historically, Marshall Suchet led an army of around 12000 men against General John Murray's 18000 English, Spanish, Italian and Portuguese troops.  However whilst his army was heavily outnumbered, he knew Murray to be an unreliable commander and believed his opponents Spanish troops, who he had defeated in the previous engagements, to be weak and unreliable.  Suchet was prepared to attack, especially when he saw his opponent make a potentially fatal error.

For his part Murray had picked a strong defensive position at Castalla, with a fortified town on a ridge line as the keystone of his position.  Spring rains had flooded the plains to the east, though it wasn't immediately obvious how poor this terrain was, and so the ridge was the main effective route for an attack.  However Murray had placed the commanders of his weaker allied brigades on his flanks, which was perhaps an error, and then on the morning of the battle he ordered Whittingham's brigade of Spaniards to march west in the face of the enemy to attempt to outflank Suchet.

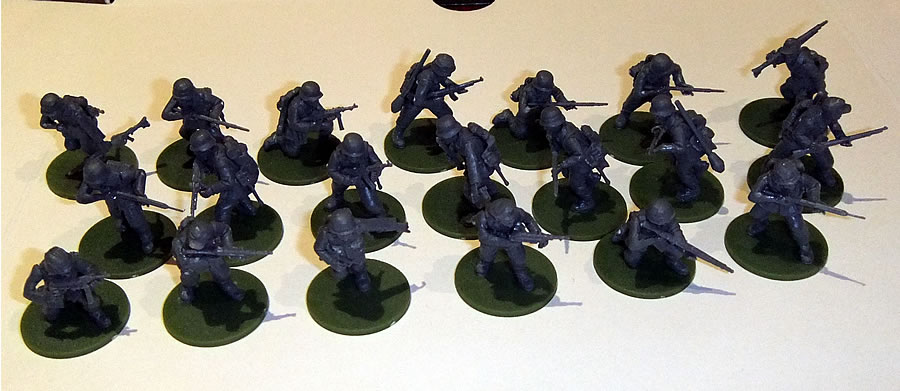
This was the starting point for the game, and we spent the first hour of the day setting up the two armies.  Some 1100 models were needed!


Above looking at the battlefield from the East to Castalla and down the allied lines.  The large force of British stationed in and around the town can be seen, with cavalry pickets below it.  In the distance the columns of Spanish troops marching to the west can just be seen; whilst in the foreground the French cavalry Division is close to the stream.

Seen from behind the French lines below, their three infantry divisions can be made out, looking up the hill at the redeploying allies.


The French were under the overall command of four players, with Martin as Suchet - taking General Roberts Division as well; and Laurie, Richard and Andy taking on other divisions - Habert's, Harispe's and Boussart's respectively.  Most of the French were deployed in column, but one battalion on their right was deployed - as on the day - wholly as skirmishers.


The allies had three commanders.  Phil took the Spanish of Whittingham and the Italians of Adam on the British left.


Gaz took the overall command of Murray plus Mackenzies troops in the centre and Roche's Spanish.


Whilst Alex took the troops of Clinton on the British right facing the cavalry division.


The game began with the French taking the first turn and Martin recognised - the fairly obvious but historically accurate fact - that the Spanish marching with their flank exposed were vulnerable to a general attack.  He immediately ordered a full advance, to charge where provident the enemy.  Unlike virtually every other engagement Martin has ever played in Black Powder, his troops immediately and actively responded to his command and Phil found his Spanish ambushed by a French assault!


Most of the Spanish managed to turn and face the attack, but the 5th Grenadiers bringing up the rear failed to respond in time, living up to Wellington's prejudices about Spanish troops.  The continued to disappoint and routed the field; leaving a dangerous gap in the line.


Phil demanded support from his commander, and Gaz responded by calling on Roche's brigade to rally to support, fortunately these too responded well and began to rush to their aid.  In the centre meanwhile the Divisions of Richard and Laurie advanced more slowly, facing English lines rather than Spanish flanks.  The French grand battery began to fire on Italian regiments to the west of the town, forcing them to retire.


To the East the French cavalry under Andy's command initially refused to advance, so the Allies under Alex were allowed time to prepare for their potential attack. A Battalion of British deployed in advance of the main line formed square, fully expecting the 13th Cuiriassiers (in one of their few actual battles in Spain) to attack.  Alex decided not to sit in the town and wait for the attack, but rather advanced his troops to shut the open door the withdrawal of Roches men to their rear had created.


To the West the Spanish were barely holding, and the rest of the French were beginning to close.


Back to the East and the Cuiriassiers, supported by a regiment of dragoons ignored the British square and charged the squadrons of light Dragoons near the bridge, The British counter charged, and received support from the Spanish Hussars to their rear.  The French hoped for support from their own Hussars, but having been sent to the east of the river, they got bogged down in flooded ground.  The attack was a disaster for the French, with a bloody draw leaving the 13th shaken and forced to retire.  Losses were similar to the 20th Light, but given the British had fought off a thousand cavalry with only 250 men they weren't complaining!

Alex folled this up on his turn by breaking his square and advancing in line on the French cavalry, he then delivered a devastating first volley to the 13th, who panicked and scattered:


By this point however Phil's Spanish had been destroyed, with the French repeatedly concentrating force on the end of the line and delivering crushing flank attacks on battalion after battalion.  Fortunately Roche's brigade had arrived to hold the line, and som squadrons of spanish cavalry helped to keep the French at bay.  The British infantry, with support of their Italian regiments tried to hold the centre, and used artillery to slow the advance of Laurie's division.


The problem was that the allied flank was effectively turned, and the French could now consider the fight to be on an equal footing at worst, and indeed found themselves with an effective reserve.  The Spanish of Roche were untried and unreliable, but fought with admirable bravery to prevent a French breakthrough.


Back in the East, Andy's luckless cavalry saw an opportunity to use the one good bridge and raise road to attack advancing infantry in the flank.  But their move proved too slow, and instead the allies were able to deliver two devastating volleys as the Hussars crossed the bridge.  Suffering horrible losses they broke and fled.  Thus a line of retreat for the allies was secured.


Which was just as well, for by now Martin's French had bludgeoned their way through Gaz's reserve, and Phil's Italians had suffered a similar fate at the hand of Richard's brigade.  Only Laurie was being held at arms length by advancing redcoats hoping to counter his advance and stop the merciless fire of the grand battery.  By this stage however 3 out of 5 of the allied brigades were broken, and the game was declared a French victory.


For their part, only the Cavalry division had been broken, and although they had losses elsewhere, no French infantry division was yet close to withdrawal.

The whole game took about three hours to play using Black Powder, despite the huge number of models and my umpiring!  History was overturned from a similar starting point, with the French victory coming from a similar gamble but running contrary to events of the day.  Two hundred years ago the French attack was held by the Spanish, and the attack on the British regiments faltered.  The French cavalry division was sent so far to the east, aiming to outflank and hold the defenders of the town, that it played no part in the actual fighting.

Another excellent afternoon of entertainment.

Friday, April 12, 2013

Dark Age Warriors

More 28mm Plastics.  With Salute just around the corner (but too far south for me to bother with) all the big British companies are gearing up for their new releases; hence the notification of the Perry Desert Rats the other day.  Checking other websites I see that another release I will probably fall victim to is coming:


GB promote these as suitable for the poorer troops of practically any nation in Europe from around 400-1100ad.  From my standpoint a box of these would add to my Vikings and Franks at the expense of some of my tattier old models.


The 40 figures in a box will retail at £20, with five torsos and a variety of options as shown above.  Compared to their previous Viking and Saxon sets, these are a more basic outing with less on the sprue and no command figures; but one that should - like Wargames Factory's Numidians - serve them and the gaming community very well, on the grounds of adaptability.

Well done Gripping Beast!


Wednesday, April 10, 2013

Desert Rats Arrive!

And the Perry's trump everyone again!


Warlord Games has done some good work putting out sets of Late war WW2 Infantry, and from what I hear the Wargames Factory figures are creditable to; and let's not forget the Plastic Soldier Company figures.  But for a combination of quality and value it's hard to beat the Perry set, plus they've wisely gone for a different campaign.  For £18 you get a complete platoon of 38 models including all the support weapons such a force should have.

I'll be reviewing the Warlord Games models soon anyway, but I think at least one set of the Perry models will also be passing through my hands at some stage too.

Monday, April 08, 2013

Warlord Games Ruined Farmhouse

No hanging around!  As the parts for the Bolt Action starter set ruined farmhouse are supplied pre-clipped from their (presumably basic) sprue, I assembled them quickly and was able in less than a couple of hours to paint them entirely:


To be honest, the parts are at the practical limits of moulding, with some of the larger bits being slightly, but noticeably warped.  It's fair to say Games Workshop have mastered this technique - and although it's an admirable start, Warlord games have a way to go.

Although the parts are modular, in so far as they are not specifically fixed in set up, they really only work in a limited number of ways.  The farmhouse itself is more or less a standard layout.


The US infantry give a sense of scale, it isn't massive, but it's a reasonable size.  The model could be expanded with the smaller parts of course, but these mainly serve to make the footprint of a second building:


As to the painting, well the models are ideal for drybrushing techniques.  To get these licked out so quickly I started from a brown craft acrylic base, building up the stonework in layers of lighter browns.  Then I did the plaster with two layers of light grey then a highlight of white.  The wood was then done with lighter browns before doing the tiles (made from spare corner pieces) and chimney pot.


The bases were part of the basic assembly and sanded before undercoating the models.  Therefore the brown base colour allowed them to be finished with minutes of drybrushing and a layer of flock.

Overall the models look great finished, and probably justify the normal £15 price tag - if you are in the market for precisely this model.  Personally I prefer it to the MDF kits I did a few months back, but on the other hand there really is only this model so choice is limited.  I wouldn't want another one!

Friday, April 05, 2013

Bolt Action - Assault on Normandy Starter Set


Karma may be trying to tell me something, I dunno, but I've been gifted a Warlord 'Bolt Action' Starter set from the Headingley Games Club.  As Warlord loves to promote its' products to clubs, they had received a starter bundle, and as the clubs active 28mm WW2 player, and scenery builder it was passed to me to do with as I see fit.

The contents (which retail for £60 ordinarily) are pretty good:


There's the rule book of course, but also 40 plastic figures, bases, a ruined farmhouse set and some of the Bolt Action orders dice.  Overall the separate price for all the items would be around£75-80 so as an entry into the system it represents reasonable value.

I'm yet to decide what exactly to do with the contents; I already have a set of the rules, and have no need for terrain, so both of these items are likely to end up back in the Headingley club, once they've been prepared for the club of course.  On the other hand, by using the models I can expand my own collection, and present demonstration games at the club for interested parties; and for this the dice will come in handy...

Decisions, decisions.  Nice to have this one to make.

Tuesday, April 02, 2013

1st Battalion, 2eme Leger - And more...

There was a lot of industrious painting in March, with the aim of increasing my forces for the refight over the Easter weekend.  I felt it essential to add at least one French unit to my forces for the game, and so I set to a recent purchase of the Hat Industrie 28mm Plastics:


One box of Marching light infantry and one pack of the Command set provides enough models for two battalions and spare figures to support other uses.  64 figures for about £20 is the best value out there, and the figures are really not too shabby!  My only reservations about the Hat models are that they are moulded in a lurid blue, that could challenge some modellers sensibilities, and the plastic itself is very tough - hard to cut and so opportunities to convert models (other than with paint) are likely to be minimal.

Size wise they maybe stand a millimetre or so smaller than Perry miniatures, and another mil less than Victrix, but it is the physique that is most distinctive.  Slender fellows these, they are well proportioned but the fine detail may not appeal to all, and they will not mix and match terribly naturally with the other major manufacturers.  Within their own unit however they'll look fine, so it's handy that Hat provide models for all the main requirements.  Additionally, the mounted officer is a nice touch, on a very pleasant horse.


Whilst pottering about with my Napoleonics collection, I revisited my War of 1812 models.  They admittedly spend more time nowadays impersonating Portuguese infantry, but that will change in time. I found a spare cannon to provide their artillery crew with something to do:


And then I added a couple of Officers to their host from the bag of bits.


Whether the Americans will ever really be used for anything is an open question.  One thing that is clear at the moment is that I am rationalising my collections quite savagely at the moment, and steady sales of items I no longer want are making space for the items that I do.  The Napoleonics collection is absolutely safe in this regard however.

The same can't be said of everything else...

Monday, April 01, 2013

Two Saga battles

There continues to be plenty of Saga action in my gaming activity of late, indeed, it seems best to try to catch up somewhat and conflate two separate games into one post today.  The first game was to introduce Martin at the Sunday venue to the rules.  Hence we actually played a couple of scenarios from the book using my Vikings and Normans.  In both games I gave Martin command of the less complicated Vikings.  Having led them to victory in the first game, he set up for the second brimming with confidence.


Using only small four-point forces we played out the river crossing scenario.  Initial Norman Aggression in trying to cross the ford proved fruitless:


However, my Norman foot troops would save the day, units of Crossbows providing excellent punch, especially when combined with long range fire.  By the end of the game, the Vikings had been cleared from the ford and the bridge, and my Spearmen were able to advance into enemy territory with impunity.


A few days later and I had another game arranged with Paul, at the Thursday venue.  We played a larger 6 point game, to the simple Warlord scenario, this time my Normans were facing his Irish.


The Irish seemed most comfortable hiding in cover, and so moved rapidly to the trees and hedgerows...


My Normans looked to outflank the majority of his force. hoping to find a weak spot.


Paul's war dogs were dispatched easily enough, and my combined fire power was enough to keep the enemy contained.


Thus the Irish were limited mainly to throwing Javelins from cover, though this was an effective tactic, especially against my horsemen.


However I surprised him on a couple of occasions by charging into the woods and picking off Irish warriors.  Elsewhere my heavy troops considered the options of entering the fields to the flush the Irish out.


But in the end they erred on the side of caution.  Simply too many Irish for them to take on alone.  My Warlord was more concerned with survival and picking off the isolated troops left in the open.


In the end, as neither warlord was killed, it came down to other losses.  At the time I totted it up wrong and concluded I'd won by a couple of points; but actually I think I'd forgotten to count some of my warriors separately, and it was in fact - so far as I could tell - a draw.

So 1-1-1 over three games.  Which seems fair.