Friday, May 29, 2020

Darkstar Paints, and More....


In the past I have made a point of how few paints I actually use in my painting approach, where many modellers seem to think you need every colour in a range, and maybe multiple ranges (and for the most part would never mix two colours together unless explicitly told to), I've long professed to make do with only 40 or so colours.  

For the most part that is still true.  

But, not immutable.  I certainly benefited from switching to a wet palette a year or so back, and adding an airbrush shortly after is really starting to have an impact, but there were techniques catching my eye that I'd never tried before, and the shortcomings of some of my materials were becoming apparent too.

One of those being my metallics.

So firstly, metallics cant be used on a wet palette, I was told as such, but tried it anyway, and the result was a swift need for new sponge in the WP.  as a result you are still mixing them 'dry', and my usual brand was not really satisfactory in this regard.  Don't get me wrong, I'd used Vallejo Acrylic metals for over a decade, well enough; but as I was starting to work with more subtle details, they were showing their limitations.

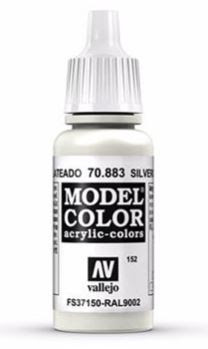
One of the worst in the range...

Some of the pigments are super thick, some almost watery, and coverage was variable, with silver and gold some of the worst to work with.  Moreover, there was no way I'd run them through an airbrush.  Still there are plenty of options out there, and so after a little research I went with a brand I'd never heard of before, who specialise in metallic paints:

All the core colours I need

The Darkstar range (Link) contains 27 metallic colours, but for my purposes only 6 will be needed, replacing my old core set.  After some use I'm very happy with the quality, and at £3.50 for 17ml the price - given GW charges £2.75 for 12ml of a basic metallic, and £4.75 for a 24ml Airbrush-friendly version.  The paints have a great fluidity, but a strong pigmentation.  They also mix well together.  Whilst there is perhaps not the midtone steel in the three 'greys' I picked, it is easy to mix any shade from those I have available.  Moreover, the dropper bottles are a well made design and feature an agitator so all that's needed is a quick shake to get going.

So far I've been greatly impressed.

Another thing I've been looking at getting better at was glazing and washes.  And to augment this I invested in a selection of inks:

£20 well spent?

These were easy to pick up as a set online, and I have yet to experiment much, but I am looking forward to some experimentation.

So as you've been so patient in listening I will offer the small reward of some actual output.  Lockdown continues to gift time where company may have been asked for, but you make the best of what you have.  As a piece of practice I did some more work with the airbrush to do the bulk of the work on a set of Reaper 'Not-Space Marines':

I don't even know why I bought these, but hey ho...

I forget their proper title.  I'm slowly working out how far you have to push false highlights through the airbrush to get the right effect.  There is still work in learning it to do, but the practice is fun.  The rest of the model paintwork was a breeze, as only a select few details needed picking out.  

One handy trick I did try here was one recommended via YouTube; I painted the Yellow over a base-coat of pink, bright fuchsia pink, and by crikey it worked!  Instead of slogging through 5, 6, 7 layers of yellow to get a solid coverage, it looked spot on with two coats.  That halved the time on that one detail, I will try it on a full figure next.  

As for the metallics, well only the bayonets got any here, not really enough to tell a story about.

If you are frustrated with your current metal effect paints however, I would definitely recommend Darkstar.

...

Thursday, May 14, 2020

Upper Canadian Militia - Volunteers

....
Back last year when I did my first batch of Canadian Militia for the War of 1812, I suggested I would produce another batch, but was stumped as to what models to use.  Well I eventually made a decision and bought a bunch, which sat and waited on the modelling shelf for months for their moment.

Of course, these days, every painting projects' moment is here!

This image from the old Osprey book on the British and Canadian forces in 1812 was to serve as my inspiration, there are only a few images out there, and few if any contemporary, but the look is typical of English dress of the working classes in that period:

   
What did I choose in the end as a base for the project?  Well, after looking at all the options, for simplicity of kit and value I went with picking up a couple of Sprues of Perry Austrian infantry off the eBay:

About £4 for 6...
The benefits of these models are the relatively simple, clean uniforms, and have the advantage of some likable elements to the present kit for my purposes; but there would still be a fair amount of work, in short:
  1. cut away all the straps for the knapsack, as I decided I wanted them without it.  This means a lot more work in conversion and assembly, but much less hassle in the painting.  This was a job for a fresh craft knife blade, as steady hand and a lot of patience.  Personally though I've always been better at carving away than sculpting on.  Alas; we'll do some of that too
  2. cut charge pouch, canteen and bayonet from the knapsacks and attach to the backs of the models
  3. sculpt replacement webbing onto the backs of all the models, connecting up the new kit and rebuilding the bread bag and charge pouch straps.
  4. trim the buttons off the gaiters and soften (scrape down) the edges of the trews.  now the gaiters will simply paint over as relatively skinny trousers, which were at least the fashion of the time, even if realistically a bit less likely for the hoi-polloi!  If you really care you could sculpt up baggier pants I guess, but at that point you might as well spend £2.50 a figure on some Knuckleduster Miniatures on import.
  5. cast up some homebrew top hats (see my post on Blue Stuff from last year too).  Trim some of the Austrian heads and mate the two elements, add them and we're good to go!
Only took a few hours once I girded my loins to the task.  I also took a couple of extra bits to make one figure stand out as probably a Sergeant:

In the raw from the side where most of the work is 
So the next task was altogether quicker and more fun, given the general lack of a fixed uniform, as can be seen in the header image.  I went with a good range of browns, creams and washed out blue-greys/blue-greens.  For the kit I decided for simplicity that they would have Quartermaster issued equipment.  This meant that using my typical subtle three-four highlight paint job these came together in just a few hours of painting

We're Canadian, ey?!
The trews more or less painted out okay, and the rest of the models looked exactly how I hoped:

Let's all stand aboot
I decided not to add the armband, so they can do double service as American militia if required.  All wrapped up these are a tidy little addition to the 1812 forces.  I now need to finish another 8 Natives, and some American Cavalry and it's another project I can pin a tail on for a while.

....


Monday, May 11, 2020

A Fast and Dirty Fight

...
Just before all this happened, myself and James had a try of a set of 'Hard Sci-Fi' rules, to get  play out of his shiny new collection of suitable 15mm troops.

The rules were apparently called 'Fast and Dirty' and if so are available, free, here:  F&D Rules but I was entirely at the tutelage of James on such matters and only had a copy of the playsheet to go by.  From what I can recall it was an Activation based system, with variable unit and weapon mechanics; but generally based on a small unit scale - 1 to 1 essentially.

I set up a - ultimately rather too open - battlefield, with a few copses of woodland on a rolling plain, crossed by a rail line and a road.  James provided a selection of papercraft buildings to go with the infantry.  As defender I had around a platoon of troops, roughly 30 men, to defend the settlement and this key crossroad, I could not know from which direction attack may come, and so spread my sections around, with a heavy machine gun in the centre and my command group based in the main building group.

Deployments 
Central force and HQ, at the Bar of course! 
Naturally the first advance of the enemy came in my rear echelon, where I had the weakest provision. 

Opening attack 
Fire from my opponents wounded a couple of soldiers, and forced the rest in to cover behind the lone building.
Then the attack intensified 
A heavy machine gun was also turned on them, and a second squad appeared in the same area, it would turn out to be the enemy HQ element.  Heavy suppresive fire was put into my rear elements, but the open terrain meant that what of my troops could respond found their targets easy to identify.

The enemy attack breaks up 
Elsewhere a withering exchange between my machine gun covering the railway, and a section of enemy in the wooded hill opposite continued; but the bloodiest exchanged proved to be when the enemy proved unwilling to enter woodland near the rail line, and instead tried to skirt around it.  My own section deployed in that position re-positioned and was able to exert a savage ambush.

It was slaughter 
By this point the attack had faltered, and although there were a few losses on my side, those of the enemy proved more severe, and the chaos in their command structure meant it was no longer possible for them to make headway.

The enemy begins to withdraw
The result was mine, but this was more a case of testing the rules.  From what I can recall nearly two months down the line (I know, I'm rubbish at doing write-ups in a timely fashion) the core of the rules was quite reasonable, with a decent activation and morale system, but we made some design mistakes.  Not nearly enough terrain for a game were ranges were essentially infinite, not enough firepower in the hands of the heavy weapons either (essentially they acted more like sniper rifles than machine guns).  

For me, a bit like Bolt Action, the suppression system rather wound down the usefulness of units irretrievably, and reduced them to simple pinging back at whoever last fired on them; there proved to be an ability to recover and revise the plan in battle.

I don't think James has, as a result, settled on a ruleset, so we may never see these again.  But he his a nice little collection of models and hopefully we'll see more of them in future.

...


Wednesday, May 06, 2020

Painting Fills those Long Days

...

Well I guess I would say that, it's been a real tonic to help keep me sane during the isolation; I guess for most of my readers, given our collective interests, I imagine those of us who can have found some solace in getting some models finished.

Today's smorgasbord goes like this:

With the Star Wars Project finished, I returned to the Conan collection, though there are now less than twenty or so models here to complete.  These are pretty simple solid colour and glaze jobs, with some highlights in certain worthwhile details.

Secondly I did a quick couple of pieces for the 15mm ImagiNations Project:
A unit of Hussars and an Artillery limber, both from various Warrior Miniatures ranges.  The Limber is from their American Civil War range, but it's adequate for my needs, I have two more to add, and at 80 pence or so per limber they are a bargain.

So where next?  Well for the blog, we may actually see a short game report.  Relax, it was played back in March...

...

Tuesday, May 05, 2020

An End to All [things Star] Wars?

...

Another day in isolation, another project finished.

It turns out I only had one model left in the Star Wars: Imperial Assault stash, but it was a biggie.

Bring out the big guns! 
This is the General Weiss upgunned AT-ST, though the command model for the hatch had to be left out so it would go inside the box in one piece!  This model, like everything these days was painted with the Airbrush, with some colour modulation of those big panels included.  Then it was a simple job of dry-brushing the edges and sponging on some scratches before giving the whole thing a shaded wash.  A pretty quick job for such a big model.

For several very good reasons this marks the conclusion of the painting side of the Imperial Assault project.  Firstly its all the models I'd bought, the last ones coming last summer.  Second nothing else will fit in the box, it is absolutely crammed.  Thank goodness I built a handy internal storage module to make sense of this lot!

All Star (Wars) line-up
67 models in total gives all three factions plenty of options, and all the content for the core campaign, and a bunch of extras.

But thirdly, it also happens that Fantasy Flight dropped the game around a year ago, and support for the tabletop version (though not online support) has ceased.  There will be no more product in the forseeable future, which means I can draw a line under this one, and just get a few games in whilst their collectible value accrues*.


*Not that this ever really happens for gamers, unless you hoarded 80's gw miniatures and D&D books in a pile of Alpha Magic cards of course....

...

Sunday, May 03, 2020

Two armies Revived!

...

TML towers has been highly productive during lock down, one of the projects undertaken has been the rejuvenation of some sad looking old armies, I painted some 25 years ago!

My 20mm Romans and Celts were the first armies I created when I returned to wargaming after university.  They held a fond place in my memories, but to be perfectly honest, they did not look terribly great:

As was...
Based on cheap card, with rather basic flock, no undercoat, no shading, no varnish.  There were a lot of rookie errors here and the motley selection of Aifix, Revell, Italieri and Hat miniatures - gathered over about 6 or so years - had suffered further from being crammed too close together (both on their bases, and in file boxes in layers).

Fast forward one descent into chaos and isolation, and I girded my loins to the task.  I've already posted about the rebasing of the models, but beyond that there were more stages to pass through.
  1. Retouch the paint work, notably the metals, woodwork and flesh
  2. Spray a shaded glaze onto both the base and figures, the only reasonable way to do hundreds of multi-based miniatures.  In absolute fairness, I didn't put enough shade in the glaze, but it did work to a point.
  3. Dry-brush the new bases and then add static grass.
  4. Paint the base edges a nice uniform brown.
  5. Spray varnish the whole lot.
And after a total of, I guess, ten or more hours of effort we get to the stage of everything being finished:
Celtic Hordes
Warbands
Cavalry and Chariotry
But of course, that's only half the output.

Roman Legions
Auxilia lead the Legion in
Auxilia Cavalry and a General's base

A total of roughly 560 models comprise the two armies.  These will work for a number of rule sets, but I have Kings of War Historical in mind for them first; within which the Romans represent about 3,000 points, to the Celts 3,500 or more.

Obviously, it will be clear they are still far from award winners, but the improved and mass-effect basing certainly makes them acceptable to return to a table in future.  The new bases are a nice sturdy 3mm MDF and the whole collection fills four file boxes fairly neatly.

Nostalgia aside, it is good to be able to go back to some of my oldest models, and put them back into service; they were far from in a sell-able condition, but it would have been a disgrace to throw them away.  Now they will hopefully serve again, for at least another quarter century.

Fingers crossed!

...